How to Get Trip.com Flight E Ticket & Receipt


Learn the easy steps to get your Trip.com flight e-ticket and receipt online.✅
How to Book a Flight Ticket on Trip.com
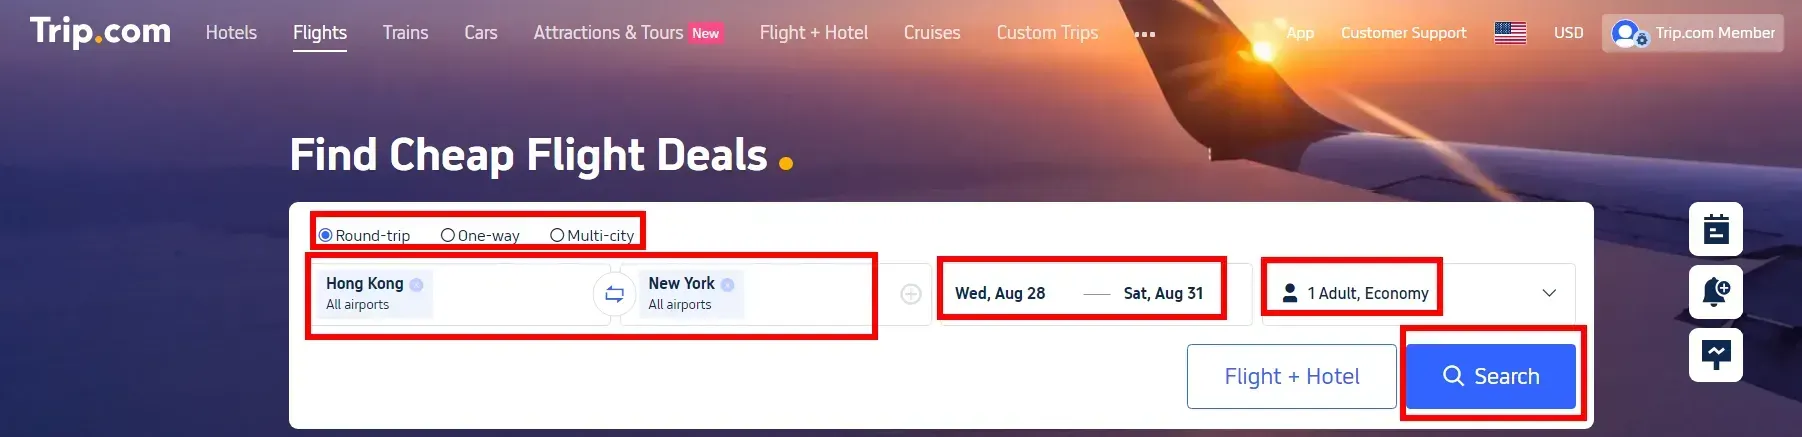
Step 1: Search for Flights
Set the following options:
- One-way or Round-trip ticket
- Number of passengers and class
- Select departure city, destination, and departure date
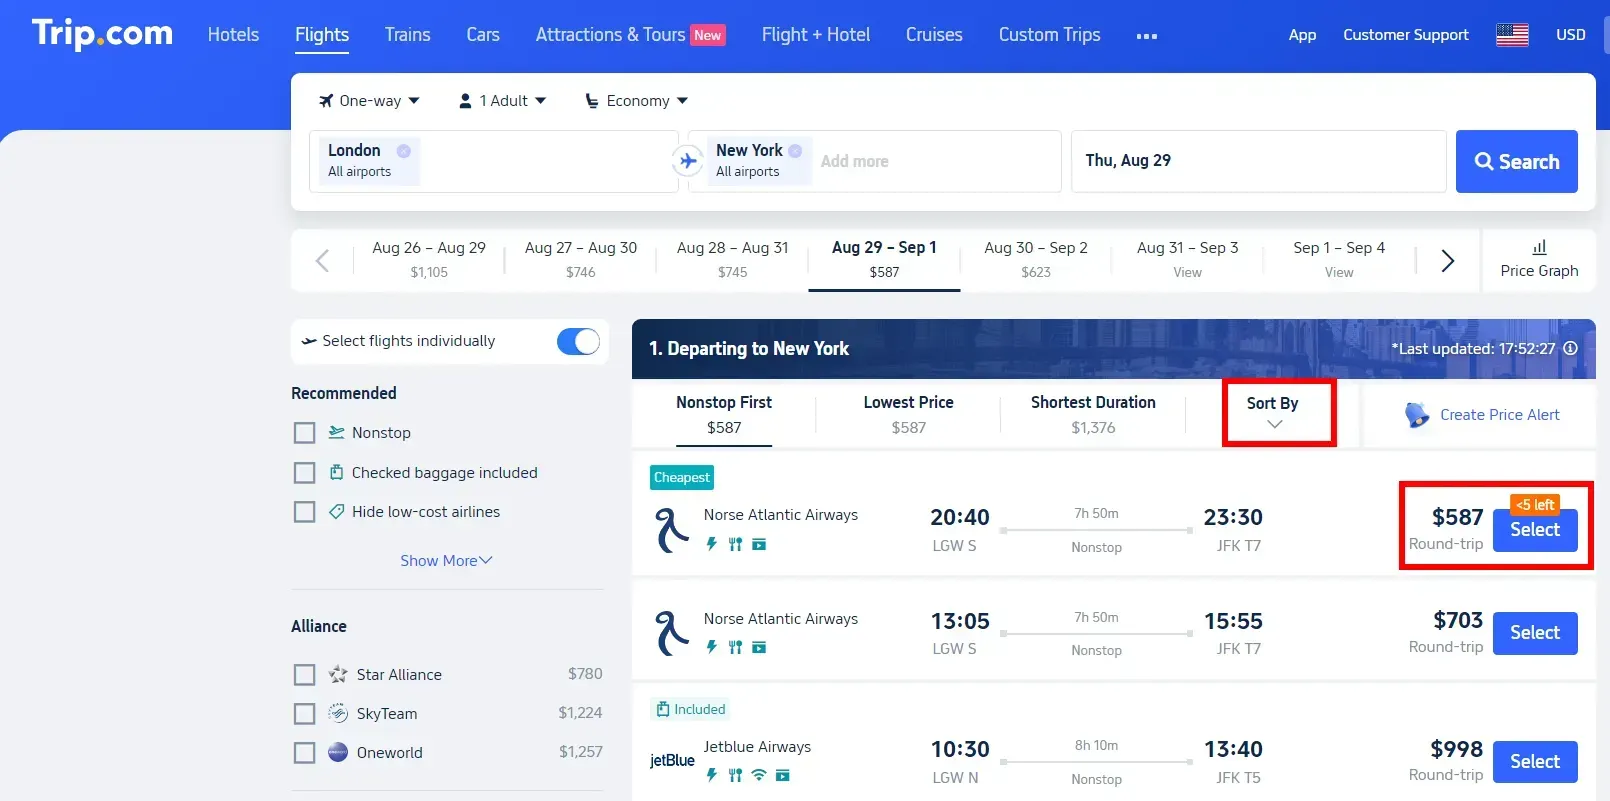
- Click Search Flights to view available flights and prices.
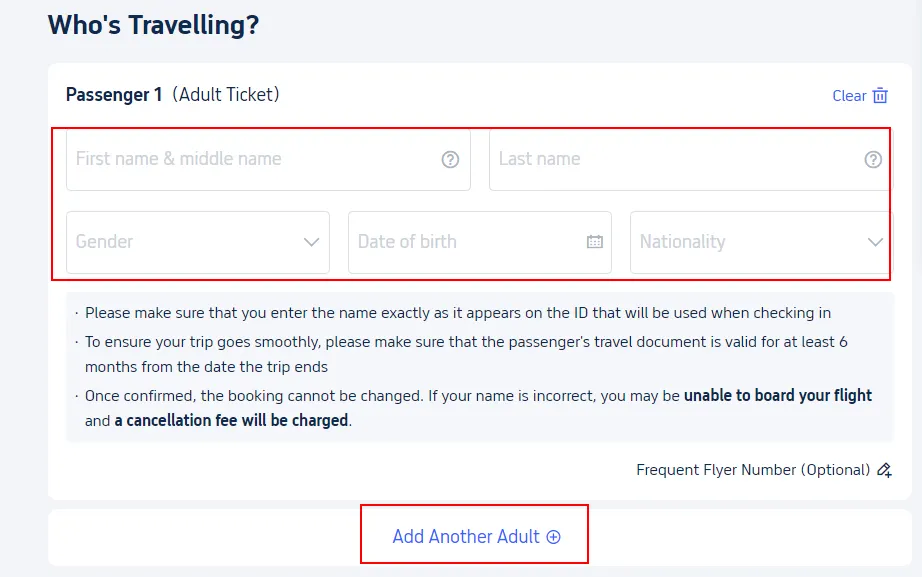
Step 2: Enter Passenger Information
After selecting your flight and price, proceed to the next page to fill in the passenger details:
- Full Name (for each passenger if there are multiple)
- Contact Information (e.g., phone, email)
- After completing, click Next.
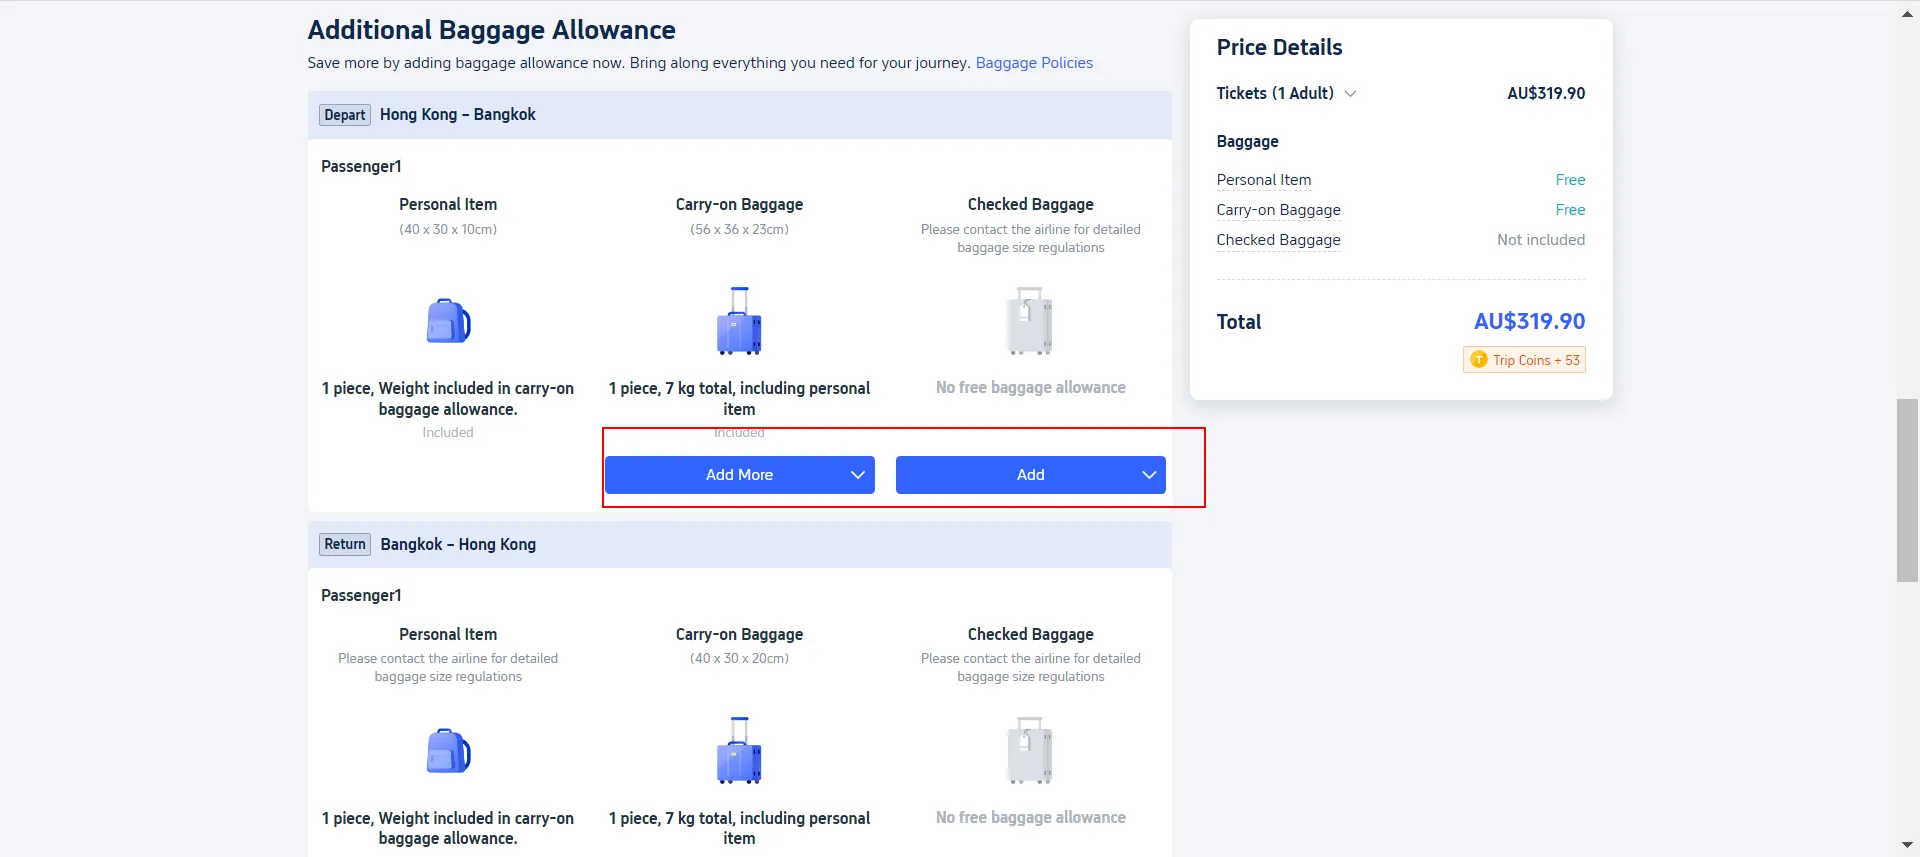
Step 3: Select Add-ons
You can choose additional services such as:
- Baggage allowance (for extra luggage)
- Insurance (for travel protection)
- Baggage protection (for lost baggage coverage)
- Flight perks (seat upgrades, meals, etc.)
Step 4: Reconfirm Passenger Information
After filling in passenger details and selecting add-ons, review your information for accuracy. Click Next to move to the payment page.
Step 5: Payment
Choose your payment method and click Pay Now to complete the payment process.
Step 6: Ticket Issuance
Once payment is completed, Trip.com will send a flight confirmation email to your registered email, containing your e-ticket details.
5 Tips for Booking Cheap Flights on Trip.com
Below are 5 tips to help you book international flights at the best prices on Trip.com.
| Tip | Description |
| Book in Advance | Secure cheaper fares by booking 2-3 months in advance. Take advantage of early bird discounts. |
| Use Fare Comparison Tools | Compare fares across airlines and booking platforms on Trip.com. Use the fare trend graph to find the best time to book. |
| Opt for Layovers | Choose flights with layovers to save money. Use Trip.com's filters to include or exclude layovers in your search. |
| Look for Promo Codes | Check Trip.com for promo codes and special discounts. Subscribe to newsletters for exclusive deals and discounts. |
| Set Price Alerts | Set price alerts on Trip.com to monitor price drops and book when the fare is lowest. |
💖If you're curious about how to stay connected fast abroad, check Global eSIM, Wifi and SIM card!
How to Get Your Flight E-Ticket (Receipt) on Trip.com
Follow these steps to retrieve your flight e-ticket through the Trip.com app.
Step 1: Find "Manage My Bookings"
| Action | Details |
| Open the App | Start by opening the Trip.com app on your mobile device. |
| Go to 'Account' | At the bottom of the screen, tap on the "Account" tab. |
| Look for 'Upcoming' | Scroll down to the middle of the "Account" page where you’ll see "Upcoming" flights listed. |
| Tap 'Flight Status' | Tap on the "Flight Status" button to access your booking details. |
| Find 'Manage My Booking' | Scroll to the bottom of the Flight Status page and tap on "Manage My Bookings" to proceed to the next step. |
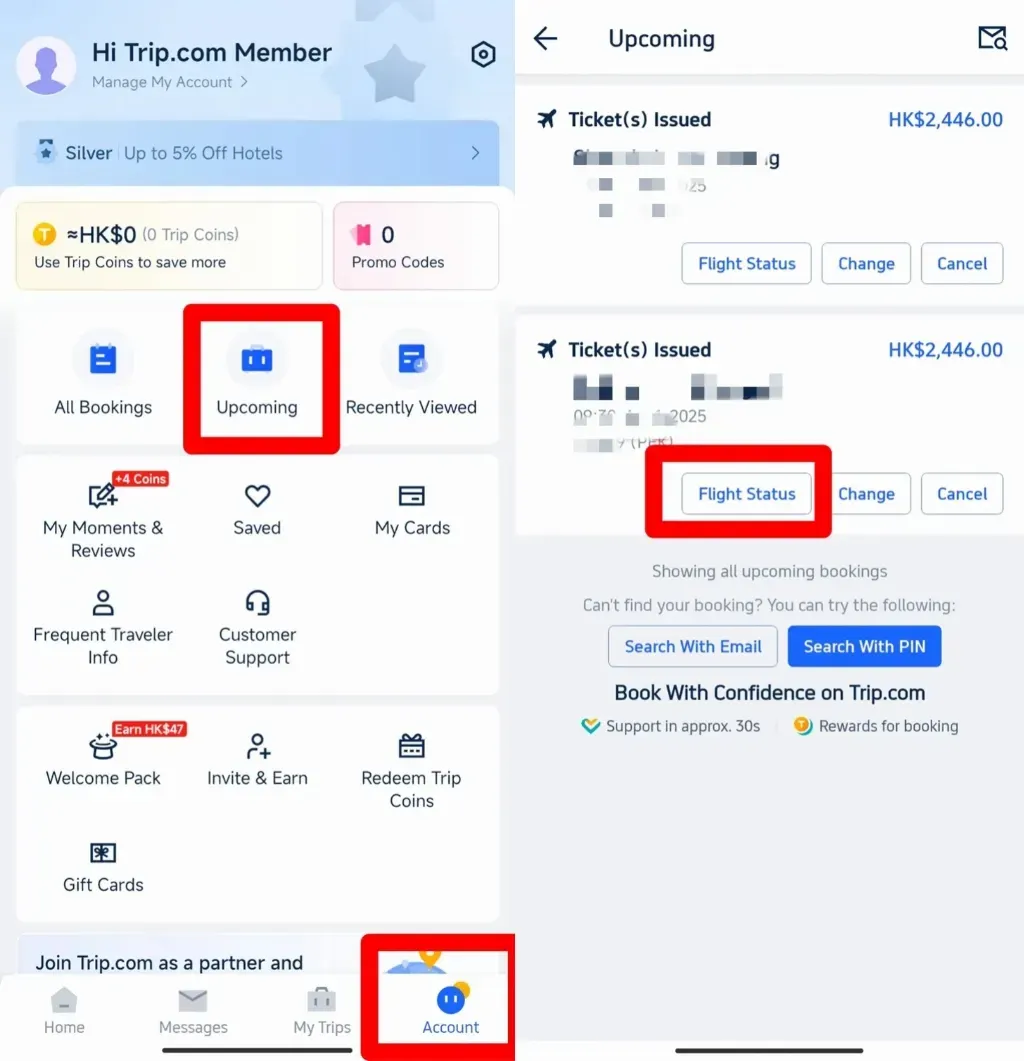
Step 1
Step 2: Select E-Receipts
| Action | Details |
| Find 'Get a Receipt' Button | Under the "More Options" section, locate and tap the "Get a Receipt" button. |
| Choose Your E-Tickets | On the receipt page, you will see a list of your flight bookings. Select the relevant e-tickets for which you want to retrieve receipts. |
| Click 'Continue' | After selecting the relevant flight e-tickets, click the "Continue" button to move forward with the process. |
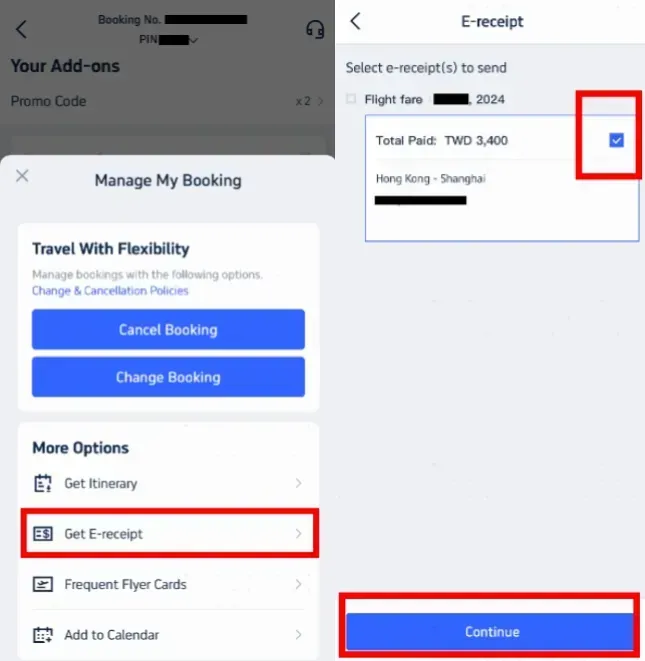
Step 2
Follow these steps to retrieve your flight e-ticket through the Trip.com app.
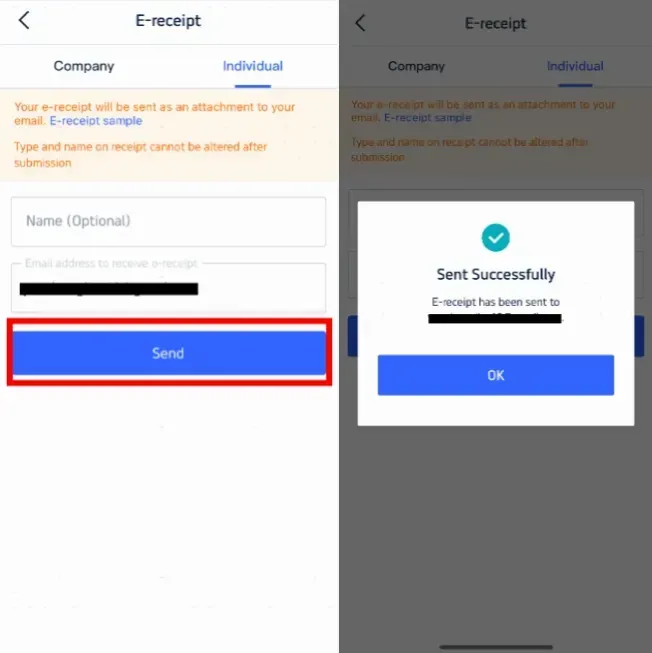
Step 3: Enter Details for Receipt
| Action | Details |
| Select Receipt Type | Choose "Individual" if you are retrieving the e-ticket for personal use. |
| Enter Your Details | Provide your name (optional) and the email address where you want the e-receipt sent. |
| Click 'Send' | Once you’ve entered your details, click "Send" to submit your request. |
| Confirmation Message | You’ll receive a confirmation message letting you know that the e-receipt has been successfully sent. |
| Check Your Email | Click "OK" and then check your email inbox for the e-receipt, which serves as your official flight e-ticket. |
How to Check-in for Your Flight on Trip.com
Method 1: Check-in During Flight Booking
| Step | Description |
| Step 1: Enter Flight Details | On the flight search page, enter your departure city, destination, date, and number of passengers, then click "Search." |
| Step 2: Fill in Passenger Info | After selecting your flight, enter passenger details and contact information, then click "Submit." |
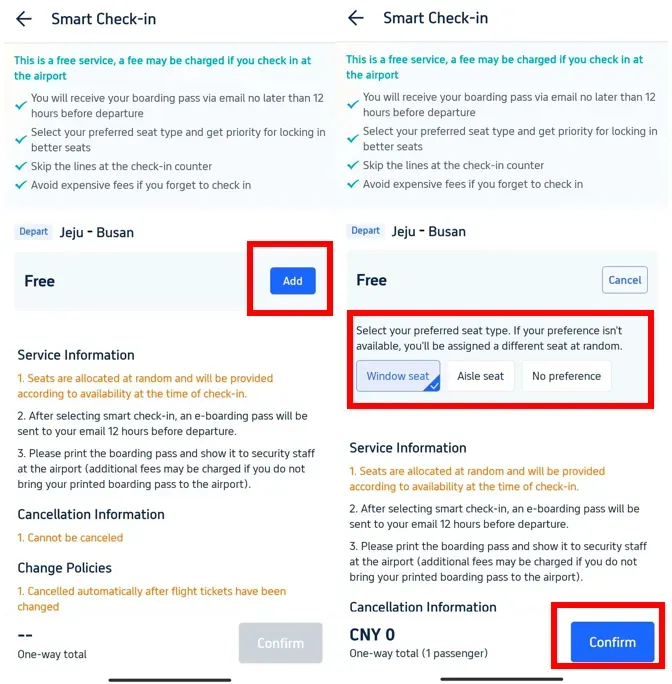
| Step 3: Check for 'Priority Check-in' | On the "Add-ons" page, check if "Priority Check-in" is available, then proceed to payment. |
| Step 4: Confirm Check-in | Trip.com will automatically check you in 12 hours before departure and send your boarding pass by email. |
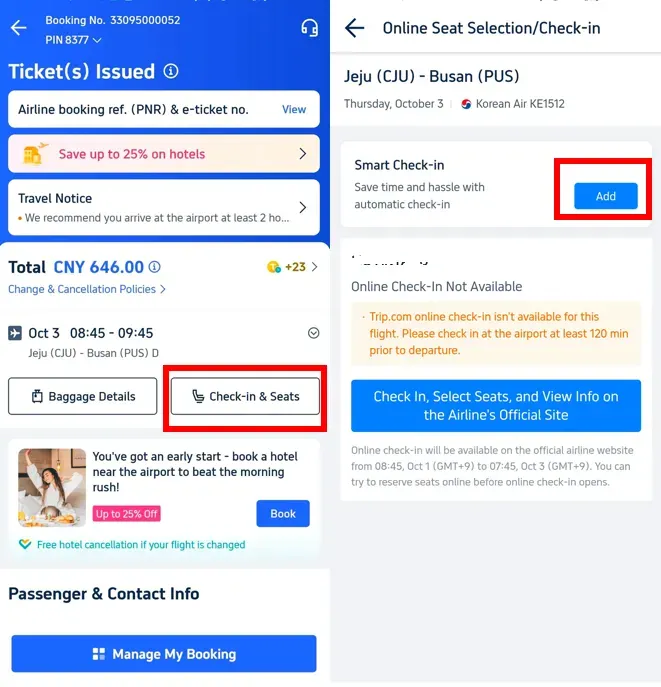
Method 2: Check-in After Booking
| Step | Description |
| Step 1: Access Your Booking | After ticket issuance, go to your "My Booking" and select the corresponding order. |
| Step 2: Select Check-in & Seat | Click "Check-in & Seats" to proceed with "Add" check-in. |
Method 3: Check-in via Airline Website
| Step | Description |
| Step 1: Visit Airline's Website | If you cannot check in on Trip.com, visit the airline's official website before the specified time and enter your booking reference number to check in. |
Method 4: Check-in at the Airport
| Step | Description |
| Step 1: Print Your E-ticket | Print your e-ticket, or carry the digital copy in case needed. |
| Step 2: Arrive Early | For international flights, arrive 3 hours before departure. For domestic flights, arrive 2 hours early. Confirm check-in times with the airline to avoid delays. |
Start Your Journey with Trip.com!
Trip.com is a global online travel agency that provides round-the-clock customer service in multiple languages. It offers convenient booking options for flights, hotels, and activities. As a Platinum or Diamond Member of Trip.com, you can enjoy benefits such as free airport VIP lounge access, the opportunity to earn more Trip Coins, and greater savings on hotel bookings. Start your travel adventure with Trip.com today!
Trending Searches
-
Top Flight Routes
-
Latest Flight Deals
-
eSIM/SIM card
-
Trip.com FAQs
- Trip.com Reviews
- Trip.com Cancellation Policy
- Trip.com Payment Methods
- Trip.com Phone Number
- Trip.com Check In
- Trip.com Ticket Issued Status
- Trip.com Change Passport
- Trip.com Customer Support
- Trip.com Membership
- Trip.com VIP Lounge Access
- Trip.com Baggage Allowance
- Trip.com Flight Ticket
- Trip.com Hotel Refund
- Trip.com Flight Change
- Trip.com Seat Selection
- Trip.com E-Receipt
- Trip.com E-Ticket
- Trip.com Flight Cancellation
- Trip Coins
- Hotels in Nansha/Daqing Mountain